featured Slider

Showing posts with label Organization. Show all posts

Closet Happenings

Closet Happenings

One of the things that we knew was going to be a bit of change for us when we moved into our house was the change in the amount of closet space that we had. Yes, we were gaining a large amount of general storage space, but we were used to a walk-in closet in our apartment that held all of our clothes. Our new master bedroom closet had one shelf and one bar and not a lot of room for the clothes of two people who own a lot of clothes.


We knew from the first moment we had our offer accepted on the house that this closet would be near the top of our to-update list. One night about 2 or 3 nights after we moved in - at the end of June - I decided to tackle this project.

I took a hammer and a crowbar and I pried out the shelf, support and bar. I was left with the wooden piece around the inside of the closet, and quite a few cracks in the walls.


I used paintable caulk, and sealed up all of the cracks and gaps in the corners of the wall, along the trim, and around the wooden piece.



Once the cracks were sealed up, I used an oil based primer to prime the entire inside of the closet - including the inside trim and the wooden piece around the inside where the shelf used to be. Then, I used Behr paint (color matched to Benjamin Moore's Simply White) and painted one coat in the closet - on the walls, trim and the ceiling.

Then, I purchased a ClosetMaid kit - the ClosetMaid Impressions 16 inch in Dark Cherry - and installed it into the closet. My aunt helped me build the shelves while she was here to help me paint, and then I finished installing them the weekend after she left. I also purchased an additional clothing rod so that we would have the stacked shelving in the middle of the closet and two rods on either side of the shelving. The rods on the right, and the bottom four shelves, are for me, and Josh has the left side and top four shelves of the closet.


In order to install it, I removed the closet doors - which were sliding doors that made it very difficult to get into the closet. As of today, we are awaiting new closet doors that we have hired a contractor to install for us. They will be french doors that allow us full access to the closet. 

While we still have clothes that flow into other closets, this organizer has allowed us to maximize our use of space. We are definitely planning on adding these organizers in closets in our other rooms, and eventually into our front half closet as well. 

It was an easy fix with a huge reward - a place to keep our clothes! - and we love that the organizer is sturdy and matches well with the style of the home. 

Have you installed closet organizers into your closets? Rearranged your clothes storage space with a little bit of paint and some new storage units? I'd love to hear about how you managed your clothes storage!

Photobucket

It's All in the Details

It's All in the Details

One of my favorite office details are my jumbo painted wooden clothespins...


I was wandering through Michael's one late August evening when I spotted a bin of raw wooden clothespins. And I didn't just 'spot them.' Oh no, I saw them and fell in love. What would I do with jumbo clothespins, you ask? At the moment, I had no idea but I knew that I had to have them and that they needed to be a part of my school office space.

spot the clothespins on the right by the corkboard!
So, I bought the clothespins, and some Martha glitter paint, and when I got home I grabbed some other craft paint, washi tape (I was out of painter's tape), a paintbrush and a ruler with pencil.


Then, I measured out a line on the first clothespin - one line on each side of the clothespin, and taped it off. I didn't have painter's tape but the washi tape worked wonderfully.


And then I painted!


I put about three coats of the glitter paint, waiting approximately 15 minutes between each coat, before declaring this clothespin fully painted.


With the other clothespin, I measured and taped off, and then painted just the bottom for the "dipped" look.


I also put a few coats of paint on the "dipped" clothespin, waiting about 15 minutes between each of them as well. After the paint was dry to the light touch, I took the tape off and allowed to dry fully overnight. 


I am beyond in love with these clothespins. They help me keep some inspiration and motivation on my desk and I love how adorable they are.


One of my favorite quotes, and some amazing words of wisdom from Elizabeth Edwards, "She stood in the storm and when the wind did not blow her way, she adjusted her sails." These pins allow me to bring inspiration and organization together at their finest - and they are a perfect complement to my work environment.
    
Photobucket

Office Space

Office Space

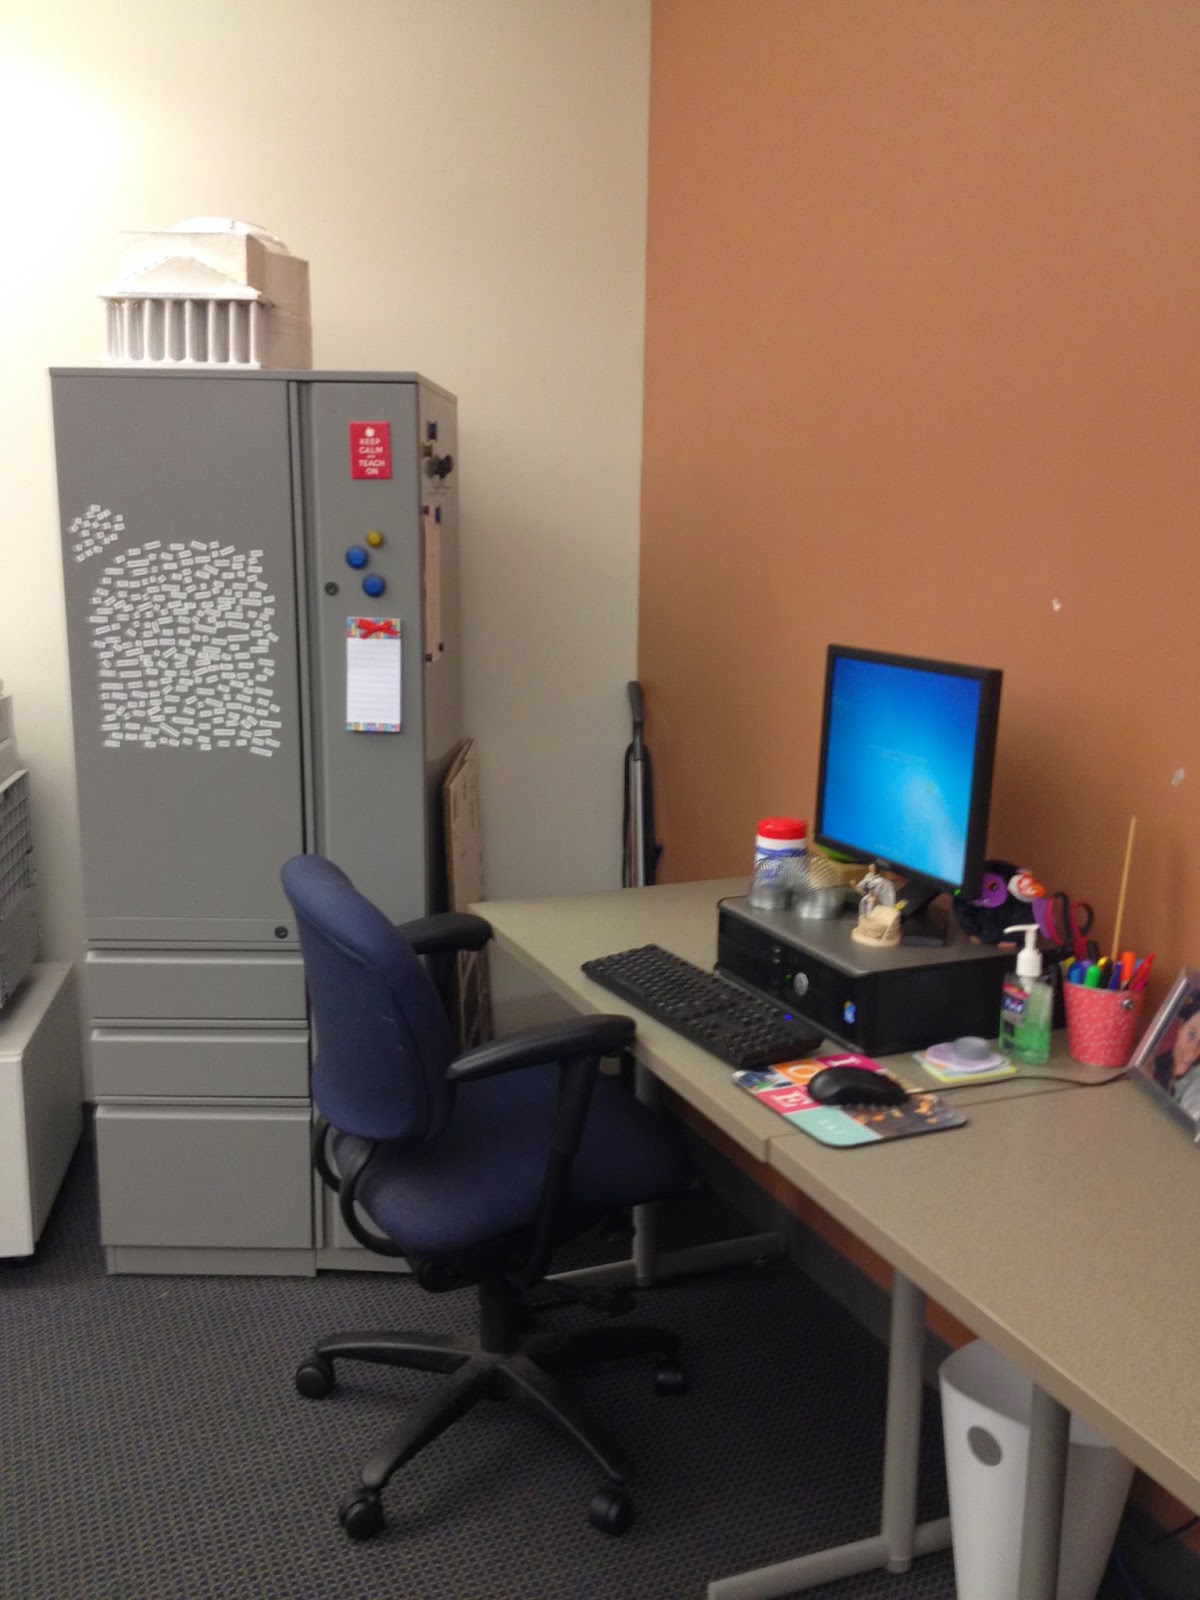
So, if you didn't know (but let's be honest, you probably did), I am a traveling teacher. 5 classes and 3 classrooms - down from 6 classes and 6 rooms last year. And so, as a traveler, my home base is an incredibly important location. My desk sits in the teacher planning room and is a highly organized and neatly decorated space that will both inspire me and keep me on track for success.

Last year, my space stayed relatively bland, but this year, I got started in August before the year even started and made sure that my space reflects who I am as a person and who I am as a teacher. When I first entered the room, it was a mess. So, first step was to get the room back in order...

Chairs in the middle of the room, recycling bin on the counter and where did the tv even come from?
It's a good thing I own a vacuum...
Sweet! Easy access to my computer!
Restoring order to the lunch area
I know it is blurry, but can we admire the clean carpet?
Order in the back half of the room is also restored! (#iphonephotosfingerhazard)
Genius poetry up, computer ready to go, and yes - that is a replica of the Pantheon from one of my amazing students from last year
Organized shelves
That was all of the progress I made the week before school. I spent a few hours at school one morning and it felt amazing to get organized and get a head start on setting up my area. I am the only teacher in my wing without a permanent classroom and so I have the most freedom when it comes to desk space in the teacher planning room.

Flash forward a week later to day one and my desk momentarily became a dumping ground before I was fully set up and ready for students to start the next day.

Things were definitely looking a bit messy for a moment...
But then they got all cleaned up! 
I am absolutely loving my desk set up this year. I love my dry erase world map (less than $20 at Michael's with a 40% off coupon) and my other pictures and mementos. They inspire me and motivate me each and every day. 

Since the first day of school, my desk has evolved a bit, and currently the space looks like this...

My desk in full swing of the school year - complete with piles of graded work to hand back, a filled bulletin board, a pumpkin to celebrate Halloween, and a space for my brand new cart! 
A close-up of my desk surface. It isn't super streamlined, but it is highly organized and everything is in its proper place.
And in exciting news - I got a cart! My cart allows me to move as seamlessly as possible between classrooms. I keep everything for the week for all of my classes with me at one time and now I also have lined paper, tissues, hand sanitizer and expo markers for each of the rooms that I use. It has made a huge difference.

How do you organize your work office space? Any traveling teachers out there? What works for you and what doesn't? I'm always on the lookout to make things easier for me, and even more importantly - for my students!

Photobucket

Coat Closet Organization {Summer Cleaning}

Coat Closet Organization {Summer Cleaning}

Some people "spring clean," but not me - this year I'm "summer cleaning." I love organizing and I'm a pretty organized person. But sometimes life gets in the way, and spots that normally remain quite organized get thrown into disarray. Last year, after we moved into our apartment, we organized the spaces that we used most often - under the bathroom sink, the coat closet, the laundry room, the pantry, etc. Amazingly, the spaces that have survived the best in the past year are the laundry room and under the bathroom sink. Unfortunately, the worst looking space is a three way tie between under the kitchen sink, the pantry, and our coat closet.


Wow, what a mess, huh? Although it is summertime, and we're not using the coat closet too much, its nice to use as storage and in order for storage to be effective, it needs to be organized. The first step here? Pulling everything off that top shelf.


And re-organizing it into these clear bins from IKEA...


The bins are under $3 a piece, and at the price, you just cant beat how well they help you get organized. With everything freshly stowed away, and some items put in the Goodwill pile, the closet felt better already!


After that, it was a quick reorganization and clean up of the bottom area of the closet, taking it from this...


To this ... 


I used the black and pink crates to store much of the loose items you see above, figuring that I might as well use what we already have on hand. And while the closet is definitely filled with an assortment of items - Swiffer sweeper, unused tent, yoga mat - now it's a cleaner and more organized space! 


Are you a fan of summer cleaning? Or do you prefer the annual spring cleaning? And are you like me - driven nuts even by messes behind closed doors? Or would you rather just shut the door and pretend it isn't there? 
Photobucket

Wedding Binder {Wedding Wednesday}

Wedding Binder {Wedding Wednesday}

Wedding planning has begun! We've been engaged for one wonderful month (1 month! Can you believe it???) and we've begun looking at venues, planning guest lists and, of course, getting inspired! 

And of course, I couldn't embark on such a big journey without at least a little bit of organization. To get organized, I created a wedding only e-mail address for all of our wedding e-mails (trust me, we're one month in and there's already a ton), set up a wedding folder on my computer, and created a binder to keep paper copies of information, and to place all of the inspiration I pull from my piles of magazines.

I bought a 2-inch white binder, and a packet of 8 dividers. I also used two other dividers to split the binder into two sections: Wedding Planning and Wedding Inspiration. Then, within each of those sections, I labeled each of the other dividers. 
 

In Wedding Planning, I have tabs for Venue Search and Information, the Guest List, our Budget and, we have incredibly generous friends and family and so have already begun a Gift List.


In Wedding Inspiration, I have tabs for Planning, etc. - which includes just about everything EXCEPT for my other three tabs, Beauty for hair and makeup inspiration, Maids for all of my Bridesmaid inspiration, and of course, Dress for my own dress inspiration. 
  
And I created a funky cover for the binder as well - using some scrap paper I already had, along with some stickers that I picked up at Michael's and some embroidery yarn I also already had. As time goes on, I plan on adding to the cover, but for now I wanted it to be open with room to grow.


This binder is great because it allows us to keep everything in one portable place - easily accessible and completely organized and customized for our use. 

Over the next year, I plan on sharing a lot of the wedding excitement with you. It may not be every week - this isn't turning into a wedding blog! - but I will certainly be posting semi-regularly in the Wedding Wednesday Series. I hope you'll enjoy it!

Photobucket

New Year, New Planner!

New Year, New Planner!

Two Fridays ago, I posted a link to the I Heart Organizing 2013 Planner. Jen at I Heart Organizing designed an incredible planner pages printable for 2013. I went to Staples to look at their selection of Martha Stewart Discbound Planners, and decided that although I loved Jen's printables, I liked the smaller size from Martha Stewart better, and decided I would create my 2013 planner from the Martha Stewart collection.


After my trip to Staples last weekend, I came home and set everything up on the table only to discover that I had bought almost all of the wrong inserts. You see how the list inserts are cut on the left to fit into the discbound system? Those are the correct inserts. But then if you look closer at the calendar insert - you'll notice it's for a hole punch system. Those are the wrong inserts.

 
And so back to Staples I went, and came home with the correct pieces.


Sorry for the glare, but at this point, it was almost 8 pm at night, and I was very excited to get the planner put together. My choices for the notebook cover were black or blue, and I chose the Martha Blue.


Inside, is a storage pocket, a binder sheet pocket, and notebook paper.


I removed most of the inside note pages in order to fit my calendar pages inside of the calendar.


After taking out the notebook paper (but saving it for later on!), I put in the planner inserts.


Between the monthly block pages, I included a tabbed insert in order to be able to quickly find the month I need.


For each week, there is space for morning, afternoon and evening, and two blank areas at the bottom. I decided to use these spaces for blog planning (top) and meal planning (bottom). This is what this week looks like for me.

This planner is the perfect size for me - and it is so easy to customize! 


There's also a space for a pen, and room to keep stickers or other notes. I love the easy close with the band and how well it fits into my bag. In short - this is the perfect customizable planner!

Have you used the Martha Stewart Discbound system before? If so, do you love it as much as I do? What are you using for your organization in 2013? 

Photobucket

P.S. I have not (in any way) been paid to rave about this planner system, but I really do love it and am so happy with how it works. That being said, if you are Martha Stewart and you are reading this, and you want to sponsor me to write about your awesomeness, I would be glad to talk to you about that!

Back
to top