A few months ago, I started using Pinterest and quickly started filling my boards with projects I wanted to tackle, but didn't actually think that I was capable of doing. Well, all that changed after I stained and painted my kitchen table and realized that maybe these projects might not be so difficult after all. So I decided to stop just pinning things and now, I pin things with actual intent to make them. And while I don't think I will ever actually make them all, and some of them are really only pinned for inspiration, I'm enjoying learning so many different crafts and being introduced to many new ideas and new blogs.
Not too long ago, I pinned an awesome looking project from the Crafty CPA and finally decided to put the computer away and get crafty myself. So get ready and get excited for a quick little tutorial on how to: MAKE YOUR OWN COASTERS. Yes, it is as awesome as it seems. Here's what you'll need:
- a pencil
- scissors
- a brush (regular or sponge) to spread on the mod podge (not pictured)
- paint chips (Behr works best)
- mod podge
- tiles (measured 3.5 x 3.5 inches)
- acrylic spray
- cork board (the self-adhesive kind in the roll)
 |
| Tiles and Paint Chips are from Home Depot - Cork, Mod Podge & Spray are from Michael's |
For the tiles, you need to use ones that are 3.5 by 3.5 inches, but as you'll soon discover when you go to your local Home Depot (unless you're fortunate enough to have these lying around - I was not) you will not find anything smaller than a 4 by 4 inch tile. And Home Depot doesn't cut tiles. So after purchasing the 4 x 4, getting home and discovering it was not the right size, returning it, finding out Home Depot won't cut tile for you and having the salesman offer to sell me a tile cutter (for $18 it wasn't bad but I wasn't looking to spend more than a couple of dollars per coaster), I got smart. I went to Lowe's. I know they're basically the same store, but something about Lowe's just seems friendlier to me sometimes. Although often the employees at Home Depot have a little bit more firsthand knowledge of projects. Oh well, you win some you lose some. Anyway, then I went to Lowe's. Lowe's cuts tiles for you. So I picked out a couple of plain 6 x 6 inch tiles (without a beveled edge and about .89 each) and had the guy cut them down to 3.5 x 3.5. And they came out wonderfully!
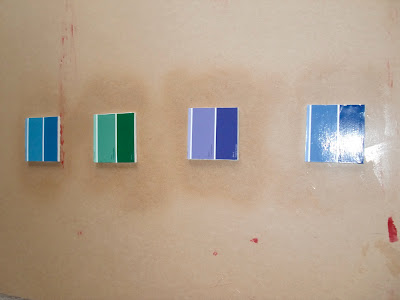
When choosing paint chips, Behr has the best ones for this project. Just head over to the paint department, peruse the chips, and pick a few to take home. I'm fairly sure this doesn't count as stealing. At least I hope not. I might ask next time I go in (because there will be a next time). I chose a gradient of purple to green (my favorite color to Josh's) and picked two blues in the middle that had cool names, because I knew I wanted to be able to see the name on the paint chip on the coaster.
Once I had purchased everything I needed, and brought together all of the supplies I already had, I got to work. Using the tiles, I traced the outline of each onto a paint chip and then cut that out with the scissors. I went back over it later (after the mod podge had dried) with an xacto knife to make sure the edges were all flush with the tile. My tiles were not as square as I would have liked, but it doesn't look bad on the tile and I'm probably the only one who would ever even notice. After cutting each paint chip using the tile as a guide, I made sure to keep the paint chip with its cut tile so that everything would go on evenly.

Then, for the first time in my life, I used mod podge to apply the paint chips to tiles. First, use the mod podge directly on the tile and then press the paint chip onto it, making sure to get rid of any ridges or bubbles that may appear. At this point, turn the tile over on your working surface and let the paint chip dry to the tile. Once this is dry (no longer than 15 to 20 minutes, just to be safe), turn it back over and apply mod podge to the top of the paint chip. The tutorial I used said to use 5 thin coats, but I found it to be fine after 3. I used a basic brush, but in the future I will be using a sponge brush because I think the application will be more even and easier to do. You can definitely see the green chip coming up a bit at the bottom in the picture below. I think using a sponge brush would have eliminated this problem.

Once the mod podge had dried (again, 15 to 20 minutes to be on the safe side), spray the acrylic spray over them. Just do a couple of lightly misted layers. When you do this, although you can do it inside, it will smell. So you should probably open lots of windows. Which I did. Except that about 10 minutes after I sprayed it, Josh walked out of the other room and asked what the terrible smell was because it had wafted into our den while he and some friends were watching football. Oops. Next time, I'll spray it outside.
 |
| Sorry about the glare! |
After 2 hours they will be dry! At this point, I used the self-adhesive cork I bought, cut out pieces that were a bit bigger than each tile, adhered this too big piece to the back of the tile, and then, using my xacto knife, cut it down so that it, like the paint chips before, is flush with the tile. Turn them back over, and you’re all done!
 |
| Here they are in their new place in our home! |
I’m really happy with the coasters and I plan on making more – some using paint chips and maybe some using scrapbook paper. Have any of you made your own coasters? Have trouble getting tiles? Please tell me I’m not the only one who went back and forth to different hardware stores 3 different times.
Hope you have a wonderful Wednesday!
Update: I linked up to the link party over on 320 Sycamore!


Super cute! I like how you have them in the tray on the table. I always have those paint chip papers laying around!
ReplyDeleteYou had me at PAINT CHIP. Now, I have a reason to use them on a daily basis. Never would've thought about putting them on coasters. Great idea! I'm pinning this so I don't forget.
ReplyDeleteVisiting from 320 Sycamore. Following you now. :)
Such fun, bright colors! Thank you for sharing this wonderful, inexpensive idea :)
ReplyDelete