
Good Morning and Happy Monday! The sun is finally out and shining - and plans to stay out for the entire day! I hope you all had a wonderful weekend. Josh and I got to spend time with friends and Nash had a chance to hang out with some other pups. I also got the chance to finally finish up a project, and take pictures of it, that has been in the works for awhile. I originally got the idea from Elise Blaha Cripe, and then saw it many times on Pinterest done with states, and so I decided to put my own spin on some nail art too.

acrylic paint
primer
nails
embroidery string
print-out (the "x" and "o")
painter's tape
paint brush
paint roller
paint roller
hammer
First, grab your board, primer, acrylic paint, paint roller and brush.

Using the paint roller (I find it creates a more even surface to use the roller instead of a brush), apply the primer to the board.

After the primer has set and dried, paint over with the acrylic paint color you've chosen. I picked yellow to add a bright and cheery pop to our home decor. It took two coats to get the color to where I wanted it to be.

Using painter's tape, I placed my cut out letters to the board, simply judging the spacing with my eye.

Then, I carefully nailed around the outline of each letter. This was the noisy part - especially when you live in an apartment complex. I didn't do it all at once, and instead did it over a few nights as to not scare any neighbors or the dog too much. In real time though, it shouldn't take more than 20 minutes or so to get done.

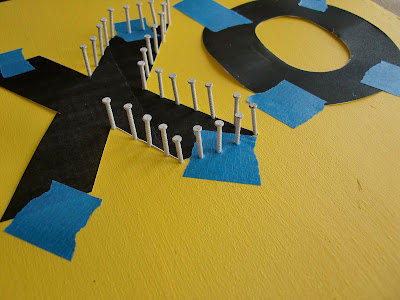
After I was done nailing the outline in, I removed the letters from the board.

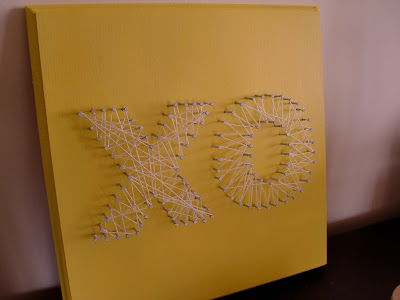
Then, using my embroidery string, I tied one end around my starting nail, making a tight knot, and then wove around each of the nails, until I had gone around each nail at least once, sometimes two or three times, and the design was complete, tying it off in another knot at the end. I repeated this same process with the second letter.


And when I was done, voila! - I had created my own nail art!


Although it was a bit tedious at the end with the string, overall this project was pretty easy and a lot of fun - and the possibilities are endless! I have some larger ones planned for the future and I also think these would make great kids crafts for Mother's Day and Father's Day - you could use just about anything to make the design - flowers, tools and sayings are just the beginning! Although of course, it would be best if the kids didn't handle the hammering in the nails part of the project.
What have you been working on lately? Adding any pops of color to your home this Spring? I'd love to hear what you've been up to!

Using the paint roller (I find it creates a more even surface to use the roller instead of a brush), apply the primer to the board.

After the primer has set and dried, paint over with the acrylic paint color you've chosen. I picked yellow to add a bright and cheery pop to our home decor. It took two coats to get the color to where I wanted it to be.

Using painter's tape, I placed my cut out letters to the board, simply judging the spacing with my eye.

Then, I carefully nailed around the outline of each letter. This was the noisy part - especially when you live in an apartment complex. I didn't do it all at once, and instead did it over a few nights as to not scare any neighbors or the dog too much. In real time though, it shouldn't take more than 20 minutes or so to get done.


After I was done nailing the outline in, I removed the letters from the board.

Then, using my embroidery string, I tied one end around my starting nail, making a tight knot, and then wove around each of the nails, until I had gone around each nail at least once, sometimes two or three times, and the design was complete, tying it off in another knot at the end. I repeated this same process with the second letter.


And when I was done, voila! - I had created my own nail art!


Although it was a bit tedious at the end with the string, overall this project was pretty easy and a lot of fun - and the possibilities are endless! I have some larger ones planned for the future and I also think these would make great kids crafts for Mother's Day and Father's Day - you could use just about anything to make the design - flowers, tools and sayings are just the beginning! Although of course, it would be best if the kids didn't handle the hammering in the nails part of the project.
What have you been working on lately? Adding any pops of color to your home this Spring? I'd love to hear what you've been up to!


I really love your write-ups guys continue the good work.bubblegum casting
ReplyDelete