READ THIS! November Review

READ THIS! November Review

This November we kicked off our READ THIS! series with an amazing novel - Dovekeepers by Alice Hoffman.

Source
I read a lot and I read often, generally on the T everyday and usually during my lunch hour too, so, since I don't have a Kindle (yet - nudge nudge wink wink) if I'm bringing a 500+ page hardcover with me everyday, it had better be worth it. And oh wow, Dovekeepers did not disappoint.

Set in 73 CE, Amazon describes the novel as this:

"Yael was born of a dead mother and father who knows how to become invisible. Revka learned silence when her grandsons lost their voices after witnessing their mother’s brutal murder. Aziza became a boy to protect herself, and hates being forced to turn back into a woman. And Shirah will do anything to protect those she loves from the horrors of the world. The power and violence of these women is evident in every word of The Dovekeepers. Hoffman’s prose is vivid and unforgettable, scorching like the desert heat, and will stay with you long after you finish the last page. A story of sacrifice, endurance, and above all, survival, The Dovekeepers is homage to anyone who’s ever held fast to their beliefs in the face of nearly insurmountable adversity."

And Amazon's description does not even begin to do this monumental novel justice. The novel begins with Yael's story, and as we travel with her from Jerusalem to Masada in the middle of the desert, we see the destruction of the Romans through the eyes of a young girl who has been unwanted and asked to grow up all too quickly. Upon her arrival at Masada, Yael goes to work in the dovecotes (see Wikipedia's further explanation here) and there she meets our three other storytellers, Revka, Aziza and Shirah. Each story picks up where the last's leaves off, but not before Hoffman speaks through each character to explain how each woman arrived at Masada and came to work in the dovecotes. Revka, Aziza and Shirah take us through almost 2 years Masada as we watch each of them grasp their true identities and come to the destiny that each is meant to reach. The novel ends with the Roman siege of Masada, with the mass suicide of over 950 people, and with a powerful conclusion to this beautiful and striking novel.

Hoffman writes this ancient with a slightly modern tone, but this tone gives strength and soulfulness to each woman's story. Hoffman writes them in such a manner that it feels as though Yael, Revka, Aziza and Shirah are giving unto each reader a precious piece of themselves. Many critics have commented on the novel's length - deeming it to be too drawn out - but I think that Hoffman gives the detail to her work that is necessary to make it come alive.

Did you find time this month to read Alice Hoffman's Dovekeepers? What was your take on it? Do you agree with me that it was a beautiful story - well-written and captivatingly honest? Or did you find it to be a bit long? For those Alice Hoffman fans out there - did you find this to be similar to her other work? Or too much of a departure from everything she is known for? Feel free to leave a comment and let me know what you thought of this novel!

And now, without further ado, here is December's READ THIS! book:

Source
While it's another long one, this novel has received tremendous reviews and is being raved about on an international scale. Published in Japan as 3 volumes, the English language (American) edition comes as one, almost 1000-page novel. Amazon describes this novel as follows:

"The year is 1984 and the city is Tokyo.

A young woman named Aomame follows a taxi driver’s enigmatic suggestion and begins to notice puzzling discrepancies in the world around her. She has entered, she realizes, a parallel existence, which she calls 1Q84 —“Q is for ‘question mark.’ A world that bears a question.” Meanwhile, an aspiring writer named Tengo takes on a suspect ghostwriting project. He becomes so wrapped up with the work and its unusual author that, soon, his previously placid life begins to come unraveled. 

As Aomame’s and Tengo’s narratives converge over the course of this single year, we learn of the profound and tangled connections that bind them ever closer: a beautiful, dyslexic teenage girl with a unique vision; a mysterious religious cult that instigated a shoot-out with the metropolitan police; a reclusive, wealthy dowager who runs a shelter for abused women; a hideously ugly private investigator; a mild-mannered yet ruthlessly efficient bodyguard; and a peculiarly insistent television-fee collector.

A love story, a mystery, a fantasy, a novel of self-discovery, a dystopia to rival George Orwell’s—1Q84 is Haruki Murakami’s most ambitious undertaking yet: an instant best seller in his native Japan, and a tremendous feat of imagination from one of our most revered contemporary writers."

One of the reviews compares it to The Girl With the Dragon Tattoo, one of my favorites, and I cannot wait to dive into this novel.

So, what do you say? Will you read along with me? It may be long, but it's definitely going to be something to keep you company on these dark (and cold) December nights. Go pick up a copy (from your library, local bookstore, or Kindle) and join me in this adventure into Murakami's 1Q84.

(And, if you're joining me, don't forget to take a button for your blog from the sidebar!)


CONVERSATION

0 comments:

Post a Comment

DIY: Piggy Bank Makeover

DIY: Piggy Bank Makeover

I love the idea of having a place to drop your change at the end of any given day. For me, this place is a piggy bank that I've had for about 5 years. Whenever my wallet change purse gets a little full, I empty it into the piggy bank. When the piggy bank gets full, I wrap the coins and bring them to the bank and deposit them. It's an easy system that works quite well. The piggy bank I've been using was a clear purple plastic one that I got from the Franklin Pierce College's Campus Activities Board. There comes a point when the "clear purple plastic" look becomes a little outdated. So, I decided to give my bank a little makeover...

A little uneven, but still pretty cute!
Now I can store my change in a much prettier piggy bank! Here are the supplies I used for this:

1 Old Piggy Bank
Ivory Spray Paint
Painter's Tape
Green Acrylic Paint
Black Sharpie Marker

This is the piggy before I started:


When I first undertook this project, the plan was to spray paint it all ivory and be done with it. Except that the ivory spray paint I have isn't as good as my Rustoleum Oil Rubbed Bronze and so after a few coats, my piggy looked like this:


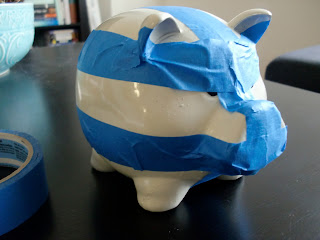
See how it's sort of dropping off the sides? For some reason, this ivory spray paint, no matter how long I shake the can for previously to spraying and no matter how lightly I spray, will not spray in even coats or without becoming goopy. I used it for another project (a candelabra I found at Goodwill for only $4) and while that turned out okay, it was a horribly tedious process and I may end up changing the color back to oil rubbed bronze. Anyhoo, back to the piggy bank, after I brought it inside and let it dry, and I drew some round black eyes with my permanent marker, I decided that I would make some thick stripes, in a bright green, across the piggy bank. To do this, I measured out lines (guesstimating, of course) with my painter's tape:


Then, using a small brush, I painted my acrylic green paint onto the piggy. And before the paint dries, remove the painter's tape to reveal your newly striped piggy!


It's back on our dresser next to one of our globes. The lines aren't perfectly straight, but I love the pseudo-preppy and slightly whimsical note that it adds to our bedroom.


Do you keep piggy banks? Or corral your change in another way? Do you like to take old items and make them look a little newer? I'd love to hear from you!

PS. Today, I'm linking up to the blog parties at Confessions of a Stay at Home Mommy, Mommy by Day Crafter by Night, Blackberry Vine, Reasons to Skip the Housework and House of Grace! Head on over to see these wonderful blogs and all the other great projects linked up!

PPS. I also linked up to Domestically Speaking's Power of Paint Party!

CONVERSATION

0 comments:

Post a Comment

Week 5: 30 Days to Skinny... The Tasty Way!

Week 5: 30 Days to Skinny... The Tasty Way!

Hello and welcome to the FINAL week of 30 Days to Skinny... The Tasty Week!


Just a quick reminder for all of you, here was last week's menu (and week 1, week 2 and week 3):

Monday, November 21: Grilled Rosemary Lamb Chops
Tuesday, November 22: Asian Grilled Chicken
Wednesday, November 23: Easy Garden Tomato Sauce
Thursday, November 24: Sweet Potato Pie
Friday, November 25: Asparagus and Poached Eggs Over Pasta
Saturday, November 26: Pasta with Italian Chicken Sausage and Peppers
Sunday, November 27: Pink Lemonade Confetti Cupcakes

And we did alright last week. After totally killing week 3, I think I lost a little bit of steam for week 4. And with the holiday coming up, let's just say I didn't make all the recipes that I wanted to this week. I do, however, have a few notes on two of the ones that did get made. The Asian Grilled Chicken is a huge hit with me and Josh. We love just about anything with Asian flavors, but this is one of our favorites. I don't ever remember to make the marinade the night before, but 30 minutes seems to bring out a nice enough flavor so don't stress if you don't have the time. And, while Josh isn't a fan, I absolutely love the Asparagus and Poached Eggs Over Pasta, except that I don't poach the egg. I just put a little PAM Butter in a pan and fry it. I do this because it takes less time and frankly, it's a lot easier. Just make sure you don't break the yolk and it's okay.

Also, I didn't make the Sweet Potato Pie. I'm sure it would have been delicious, but the crowd I was baking for probably wouldn't have loved it. Instead I made 2 fattening pies - one apple and one chocolate - and everyone devoured the chocolate one but the apple kind of fell short. Maybe this was my karma for not making the sweet potato pie. To the healthy food gods, I apologize.

To atone for my unhealthy food sins, I give to you all this final 30 Days to Skinny... The Tasty Way menu, inspired by and filled with recipes from Skinnytaste's very own Gina Homolka:

Monday, November 28: Chicken Quesadillas
Tuesday, November 29: Pork Chops with Dijon Herb Sauce
Wednesday, November 30: Chicken Francese

I am super excited for these final 3 days, and I cannot wait to recap with you all back here on Thursday to reveal our favorites from this challenge! I'd love to hear from you about how you're doing with the challenge - feel free to leave a comment! Good luck with the final week!

CONVERSATION

1 comments:

Post a Comment

I'm Daring to... Eat (Bake?) Cookies!

I'm Daring to... Eat (Bake?) Cookies!

Good Morning and Happy Monday! Did you all have a relaxing holiday weekend? I had 4 and a half days off and while it felt like it was going slowly at first, by Saturday evening I couldn't believe that I had only 1 day left to relax! But we had a fantastic weekend, saw family and caught up with friends! And I made sure to find time to make some delicious cookies!


This week, I'm linking up again (week 3!) to the NewlyWoodwards' Dare to DIY Blog Party!
Dare to DIY

For this week's theme, Dare to Eat Cookies, I baked a delicious batch of rugelach - a traditionally Jewish recipe that creates a crescent cookie filled with almost anything you want. I filled some of mine with chocolate chips and others with dark chocolate chunks & walnuts. Here's a list of what you need to make these delicious cookies:


2 cups flour
1/4 tsp. salt
1 cup butter
1 pkg. cream cheese (8 oz.)
1/3 cup sour cream
1/2 cup sugar
1 tbsp. ground cinnamon
1 cup finely chopped walnuts
1/2 cup chocolate chips (or raisins, if you prefer)


First, cut the cold butter and cream cheese into bits and put them into your food processor. In order for this to work best, do not let the butter or cream cheese warm up at all before you begin.


As the food processor fills up, you may begin to mix these first two ingredients together to make more room.


Next, add the sour cream and 2 cups of flour. 


Mix together using the food processor. Then take the mixture and separate into 4 equal size balls. Form a disc from each ball and wrap it in plastic wrap.


With floured hands, it is easy to roll the dough into a ball.
Then fold over one side of the plastic wrap and flatten the ball into a disc.
Fold the other side of the plastic wrap over...
and then fold the ends in.
Then place the discs into the refrigerator to chill for at least 2 hours, but not to be kept chilling longer than 2 days. 


When ready to continue, combine sugar and cinnamon in a small bowl and get your other toppings (chocolate, nuts, etc) prepared. Also, preheat your oven to 350 degrees.


Cinn/Sugar Mix
After at least 2 hours, remove the discs one at a time and remove from the plastic wrap. Using flour to cover your service and to use on your rolling pin, roll out each disc.


Then, sprinkle the disc with sugar and cinnamon mixture. Then sprinkle your chosen topping over the sugar mix.


Using a pizza cutter, slice the disc into wedges.


Then take each wedge and roll into a crescent. Place each crescent onto a baking sheet and, when filled, place the sheet into the refrigerator to chill for 20 minutes. 


After the 20 minutes, bake on center rack of oven for 22 minutes, until lightly golden. 


Finally, remove from the oven and cool on wire racks (or a plate if you, like me, don't have wire racks). And, ta da - rugelach!


These are some of my favorite cookies to make this time of year! Do you have a favorite? I'd love to hear about! And if you're visiting from the blog party, thanks for stopping by! 

CONVERSATION

3 comments:

Post a Comment

A Very Thankful Thursday

A Very Thankful Thursday

Happy Thanksgiving!!! I hope that you are all enjoying time spent with family and getting ready to eat some delicious Thanksgiving food: turkey, stuffing, cranberry sauce, green bean casserole (mmm!) and then getting ready for some delicious dessert too!

Today, I am thankful for this amazing life that I am fortunate to have. I am thankful for so many people in my life, from Josh, to my Mom, Dad, Stepmother and Brother, to Josh's family, and to all of our wonderful friends. I would not be the person that I am without their presence in my life. I am also thankful for our handsome little pup who helps me to appreciate the little things in life. I am thankful for my health and for being able to be here blogging to all of you. I'm also happy for our beautiful apartment (with it's awesome view!), the smell of pie baking in the oven and (particularly today) the Macy's Thanksgiving Day Parade - my favorite!

So please, have a wonderful day and take a moment to think about all that you are thankful for in this beautiful world we are all so lucky to be a part of.

Source

CONVERSATION

0 comments:

Post a Comment

DIY: Sunglass Storage

DIY: Sunglass Storage

Good Morning and Happy Wednesday everyone! Or should I say happy Friday? Don't you just love short work weeks? I know I do! Today, I have this fantastic project to show you as inspired by Emily over at Cupcakes and Cashmere which, if you don't already know, is an absolutely wonderful blog filled with fashion and photography and just all around goodness. I highly, highly recommend that you check it out. In the meantime though, I am trying a project that Emily showcased here and it looked like it would be an easy solution to the chaos that exists between Josh and I and keeping our sunglasses in order.


To make this, I grabbed a cheap frame from Michael's (40% off AND during their buy one get one sale) and also picked up a picture hanging kit. Emily advises you also use a pic tool and although I asked at my local Lowe's, the guy looked at me like I had three heads. So instead, I just used a hammer and a nail. And I also used scissors to cut the hanging wire. (Disclaimer: I apologize for the picture quality you are about to endure. These pictures were taken at night and without turning on all of the lights in the room. Oops.)


Then, I took out the inside of the frame, and measured the inside back and found out it was 14" long. I marked the frame at 7" and then moved down an 1.5" from the top and 1.5" from the 7" mark. Then I estimated where the middle was and made my X marks the spot there.


After making a quick start to a hole with the hammer and nail, I set to work using the holes as starter holes for the screw eyes. The wood was relatively pliable and this only took a minute or two.


Then I used the wire and tied it around one end, stretched it across, cut it, and tied it around the other end. I used the screw eyes to make it as taut as I could at the end. 


Finally, I took it into our closet, grabbed the sunglasses I could find scattered about (we I have about 3 more pairs lying around somewhere) and used the wire to hang them up!


And ta da! All done! A big thanks to Emily for the inspiration - this definitely makes things cleaner and more organized and adds a little bit of style into our lives! What do you guys think? Am I the only one thinking about sunglasses when its dark and gloomy and pouring rain outside? It's going to be nice again this weekend though, so I think I'm just preparing for that! See you back here tomorrow for Thanksgiving Day excitement!
PS. I linked up to Handy Man, Crafty Woman's Blog Party and to the Sugar and Spice Blog Party at seven thirty three!

CONVERSATION

1 comments:

Post a Comment

26 Soups: #2

26 Soups: #2

I am moving right along with my 26 soups challenge (as part of my yearly birthday goals) and this weekend I made an unbelievably delicious roasted acorn squash and leek soup.  


And - you guessed it - it was simple, quick and easy to make! The recipe is from Skinnytaste (which inspired my 30 Days to Skinny... The Tasty Way! challenge). I did alter it a bit from the original recipe (found here), but the ingredients are as follows:

2 acorn squash
1 tbsp of butter
1 large leek
3 cups fat free chicken stock
secret ingredient, to taste

First, slice the 2 acorn squash in half and place them on a cookie sheet in the oven for 45 minutes at 350 degrees. 


Then, wait until the squash is cool enough to handle before moving on to the next steps. 

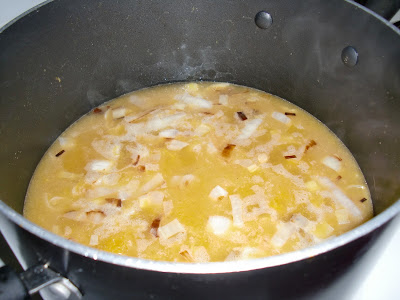
After the squash is cool, chop up the white part of your leek and saute with the tbsp of butter in a medium saucepan over medium-high heat for approx. 5 minutes. Then, scoop out and discard the seeds from the cooled squash and scoop the remaining squash from the skin into the pan. Then, add the chicken stock to the pan and simmer for about 10 minutes. 


After simmering, use a blender to puree the soup. All of the soup should fit into the blender to blend. Then, return the soup to the pot (or to a large serving bowl - I found the pot was easier) to serve.


Finally, I added just a few drops of my secret ingredient...


Heavy Cream! The soup was delicious on it own, but I really think the drops of heavy cream enhance the soup's flavor. You may want to add a dash of salt or pepper if that's your thing. And voila! Roasted acorn squash and leek soup!


Mmm! So good! And it's even great chilled! The recipe is supposed to make 4 servings, at about 1 and 1/4 cup per serving, but at only about 150 calories per serving, I think it's safe to say that this soup really does best as 2 servings, 2 and 1/2 cups per serving and at about 300 cals per serving.

Post Mixed in Cream - Delicious!
Have you been craving soup too? I think it might be somthing about this time of year. This soup hit the spot though! And was so incredibly easy! I cannot wait to make it again and again. This is a wonderful addition to my soup list and I hope you enjoy it as much as I did!


CONVERSATION

0 comments:

Post a Comment

Week 4: 30 Days to Skinny... The Tasty Way!

Week 4: 30 Days to Skinny... The Tasty Way!

Welcome to week 4 of 30 Days to Skinny... The Tasty Way! Get excited for another week of delicious and healthy food. Before we get to this week's menu (and a recap of last week's), I want to share with you something magical that happened last week. When I made Friday night's red snapper (on Thursday night), not only did it turn out beautifully, but it was so beautiful looking (and smelling) that Josh tried it. He tried it, and then he liked it, and then he went back for more. Seconds. Of fish. And here I thought that I was going to be whipping up some blackened chicken pasta after he tried the snapper. Seriously folks, it was magical. This is why you need to take a moment to try to bring this challenge into your own kitchen. It makes magic happen.


Here was last week's menu (and week 1 and week 2 if you want to check them out):

Monday, Nov. 14: Easiest Pasta and Broccoli
Tuesday, Nov. 15: Broiled Tilapia with Garlic
Wednesday, Nov. 16: Asian Flank Steak Skewers
Thursday, Nov. 17: Roasted Broccoli with Smashed Garlic
Friday, Nov. 18: Roasted Snapper Filet
Saturday, Nov. 19: Pork Chops with Mushrooms and Shallots
Sunday, Nov. 20: Roasted Acorn Squash and Leek Soup

I did pretty well keeping up with recipes this week and I think that the changes I made suited the tastes of both me and Josh. My favorite was the broiled tilapia with garlic, although the soup was a very (extremely) close second. Josh's favorite was the steak (no one should be surprised by this) but he did like the snapper and doesn't want it again soon, but will eat it again. This is okay though, because what I learned this week is that snapper is incredibly expensive. And since we're trying to live more frugally than not, we will not be eating such expensive food every week. But I am very glad we tried it and it was delicious.

The only major change I made to any dish (and I wouldn't even call it major) was that I unskewered the Asian flank steak skewers. We're just two people and didn't need to be eating off of skewers. Also, I want to note that I should have looked at the recipes a bit more before I put all of these together as I unknowingly placed a large amount of garlicky recipes together. By the end of the week, Josh requested that I don't put any more garlic into any more dishes. Oops. But really, they were all yummy dishes and I was super happy with every one.

And now, the toughest week of the challenge - with Thanksgiving falling right in the middle. Here is week 4 of the 30 Days to Skinny... The Tasty Way! as inspired by Skinnytaste's very own Gina Homolka:

Monday, Nov. 21: Grilled Rosemary Lamb Chops
Tuesday, Nov. 22: Asian Grilled Chicken
Wednesday, Nov. 23: Easy Garden Tomato Sauce
Thursday, Nov. 24: Sweet Potato Pie
Friday, Nov. 25: Asparagus and Poached Eggs over Pasta
Saturday, Nov. 26: Pasta with Italian Chicken Sausage and Peppers
Sunday, Nov. 27: Pink Lemonade Confetti Cupcakes

Are you as excited as I am for this delicious looking menu? Feel free to head over to Skinnytaste yourself and use any of her Thanksgiving recipes to swap for your Thanksgiving dinner on Thursday. I will be doing a feature on last week's Roasted Acorn Squash and Leek Soup later this week and I'd love if you stopped by to check it out! Good luck with week 4!

CONVERSATION

0 comments:

Post a Comment

I'm Daring To... Entertain!

I'm Daring To... Entertain!

Good Morning! And happy Monday! Did you all have an amazing weekend? From projects, to shopping trips, to a wonderful Saturday night date night with Josh -- our weekend was fantastic! Did it really have to end? I'm definitely looking forward to the short week and time spent with family over Thanksgiving. But, enough about the rest of the week ahead, let's get to the awesome project I want to share with you today. As I did last week, I'm linking up to NewlyWoodwards' Dare to DIY Blog Party Each week for 6 weeks (this is week 2), I will be taking on one of NW's DIY dares. This week's dare is to entertain and so, I am showing you our dining table:


Now, we don't usually keep everything set out there and since it's just the two of us normally, we don't really feel the need to do so, but, I did decide it was time to get a table runner. However, why buy one when I could make one instead? I found this incredible tutorial through Pinterest over at Crissy's Crafts.

                                                                          Source: crissyscrafts.blogspot.com via Sara on Pinterest

How great does this look? So I created my own version using these simple materials:

2 yards material
no sew tape
scissors
iron
ribbon

Seriously, does it get simpler? That's right. I didn't think so either. So, first, I took the 2 yards of fabric and cut them in half lengthwise. (I'll save the other for a table runner in another season.) Then, I created a hem and using the iron, first made a crease in the hem. Then, I used the no sew tape and put it inside my hem.

I love this stuff. I plan on using it for lots of things.
After placing it inside of the hem, I ironed each side for 3 seconds. Then my hem looked like this:

Ooh, pretty!
On each end of my runner, I added 2 layers of ribbon, again, using the no sew tape. First, I used the very methodical way of measuring by using a playing card to make sure each side was equal.


Then, I laid the first piece of ribbon down over the no sew tape and ironed that (front only this time).


Then I repeated the process with an orange ribbon over the brown one.

Sorry for the glare...
 And there you have it! A super simple, no sew table runner!

Please ignore the present lack of curtains. Thanks!

Centerpiece close-up!
If you look really closely, you can see my reflection in the vase! I think I look a little too serious, but in my defense, it was taken very early in the morning - so maybe it's just sleep? Either way, I hope you enjoyed my tutorial! For a bit more streamlined one, definitely head over to Crissy's Crafts to check out hers! I hope you have a wonderful start to your week and don't forget to stop back later for Week 4 of 30 Days to Skinny... The Tasty Way!

PS. I also linked this up to House of Grace's Twice Owned Link Party!

HOG

CONVERSATION

2 comments:

Post a Comment

Back
to top